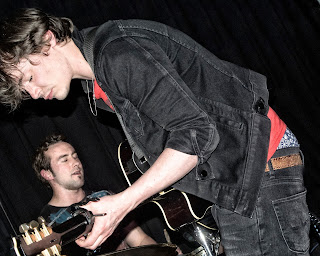
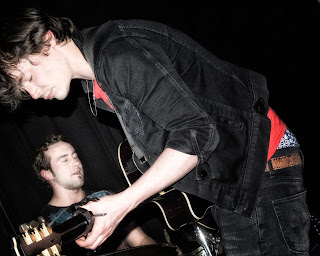
Here I'm going to walk through what is pretty much my standard recipe for post processing live band shots. This example is based on a performance by The Black Sparrows, 12th June 2013 at The Rhythm Factory, Whitechapel, London.The image features the lead singer (Dan Hunt) and the Drummer (Kai Hughes).
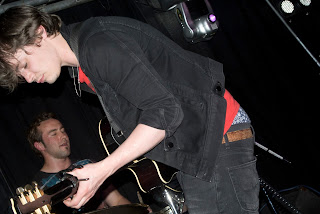 I was shooting with my Nikon 1 V1 using flash (as the stage lighting was abysmal!). The original out of camera shot looked like this (right). I felt this shot had a lot of potential due to it's unusal composition and the opportunity to show the lead singer with the drummer. It's often difficult to get a meaningful shot of the drummer with other band members as they are shuffled so far into the background. (30mm, 80mm effective. f5.6, 1/60, ISO800 with flash)
Step 1: Crop
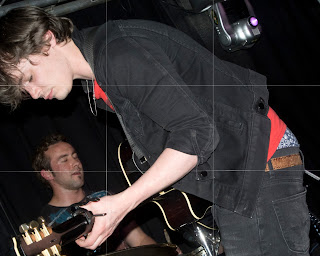 My first step is usually to apply the crop, this means that you're then working with a smaller image so as you start to build up layers you're not wasting processing resources handling parts of the image that will be thrown away. With large digital files and several layers you can find you're waiting around for each processing step to complete. If a photograph needs perspective adjustment, or large object removal I may do those things first, as the extra space in the image before crop can be helpful in haveing some spare background to clone from.It's also important to crop early as some filters work in a gradation from centre to edge (e.g. edge burns). If you crop after such actions you will find the filter effect is unbalanced.
For this crop I chose a 5:4 aspect ratio. I never crop images to abstract ratios. By thinking about 'standard' aspect ratios I know that the image will work in whatever context it eventually turns up in without having to worry about creating bespoke frame sizes, of compositing it in an arrangement with other images. Also arbitary aspect ratios can end up looking 'odd' simply because we're not used to seeing suchh images. All rules are meant to be broken but this is a good starting point. The usual ratios I use will be: 1:1 (square), 5:4, 6:4 (full frame), 2:1, 3:1, 5:1 (panoramics).
The original shot looks unbalance due to the excess space to the right. So I made sure the space above and behind the lead singer we're balanced, and quite tight since the space in front and below was cropping off the head and guitar. This tightness complements that cropping in the origanal shot. The 'rule of thirds' cardinal points fall (see the grid overlaid in the image) on the shoulder and elbow. This places the strong diagonal of the arm pleasingly to emphasise the angular positioning of the lead singer.
Step 2: Noise Reduction
I always apply noise reduction to all images. Sometimes it is difficult to see the effect except at high magnifications, but since you don't know exactly what demands will be placed on the image in future it is best to ensure maximum quality at this stage. Noise reduction should be applied early in the processing, before other tools and filters start to mess about with the pixel values, which I feel could interfere with the noise reduction algorithm's ability to recognise noise. Also, because I'm shooting on a Nikon camera I always use Nikon's own noise reduction software (Define 2.0) as I believe this software has more chance to understand the noise perculiarities of the hardware.Step 3: Liquify
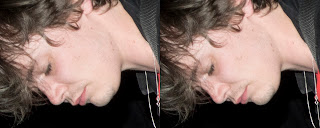
This step is a little controversial since it is effectively a vanity response. However the image should be portraying an essence of the subject. A single fraction of a second captured by the camera does not necessarilly do that. In this shot I've flattened out the bulge under the chin. Certainly this makes the shot more pleasing for the subject (which is important, it helps the subject trust your work going forward which gives rise to more opportunity for future shoots). In reality when meeting this lead singer you don't take note of a 'flabby chin' which this specific pose creates so it's not esentially unfair to tweak this. It's a judgement call.Step 4: Tone Adjustment
Because of the use of flash and the relative distance of the two subjects the drummer is under illuminated. To balance the tones I switch to Black and White (using Nikon's Silver Effects Pro filter) and selectively lighten/darken where needed, in this case emphasising the drummer's face. Later I will return to full colour by using this black and white layer in layer blending mode 'luminosity'. I could have used Photoshop's native dodge/burn tools in the original colour layer, but the filter I employed gives fine control which can be tweaked as you observe the effect. The Dodge/Burn tool acts instantly on the image and if you over-do the adjustment the only choice is to step back in history and to try again.Step 5: Sharpening/Structural enhancement
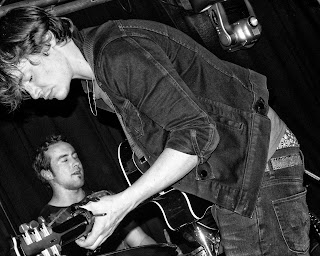 Before returning to working in colour I apply any overall sharpening needed, either with Photoshop's native Unsharp Mask filter or (as in this case) with the same Black and White conversion filter I used in step four. Again the Silver Effects Pro filter gives me greater control. Here I have driven up the 'structure' of the overall image as far as possible to add to the textural effect of the denim. This adjustment is unkind to skin tones though so I have then knocked the structure adjustment back in the faces and the arm.I typically then select a very small area around the eyes and drive the structure higher again. If the eyes are open at this point I will also tweak the brightness/contrast to ensure they stand out.
In this image I also finally (in Black and White mode) applied some limited dodging. This reduced the darkness around the eyes that is often a consequence of harsh directional lighting (either stage lights or flash).
Step 6: Blend toned and sharped results
Once I'm happy with all of the black and white tweaks I convert that layer's blending mode to 'luminosity' in order to return to colour working. You can compare the pre- and post- versions below. You can see how the texture of the denim leaps out of the image now and how the drummer is much more a part of the composition by brightening that area.Step 7: Background distraction removal
Because these are live shots it's often impossible to effect fine control over the backgrounds. Also stages can be very messy affairs. Some elements of the background will add to the atmoshpere of the shot but very often a degree of clean up improves the overall cohesion of the image. In this example there's a tiny part of gantry behind the lead singer's head which is too small to really convey the sense of the stage structure and so appears as a distraction to my eye. There is also a large lighting projector with an unfortunate highlight. I remove these with a simple Clone Stamp operation. The removal can be quite gross since I know the background will be quite dark by the timne the image is complete.
Step 8: Atmospheric effects
Most of the actions so far have been localised, concentrated on specific areas of the image. At this point I apply overall image filters. Typically some form of edge burn which is often a good idea to ensure the image is strongly bounded and doesn't look weak as the image meets it's borders. In this cae I used Colour Effects Pro's Darken edges, Lighten centre filter. I also apply a degree of 'glow' which adds some diffusion relative to the tonal values.Step 9: Final Review
At this point I save the image out to it's target format and file size then reload it to take a final review. In this example I notice a small triangular greyness in the very top right of the image that weakened the image corner. So I simply clone stamped that out. After all of the foregoing detailed work it is very easy to miss some small issue so a final review when you think you're done is essential.And that's it. My typical approach to finishing a shot.
